Do you need a reliable identity management service for your application? Don't reinvent the wheel by coding your own. Try Microsoft Identity Platform. This article will introduce you to the service and give you information on how to start adopting it.
What is it?
Microsoft Identity Platform is a modern cloud-based identity solution from Microsoft that consists of:
- standard-compliant identity and access management service (Azure Active Directory)
- management portal (Azure Portal)
- application programming and command line interfaces (API & CLI)
- open-source libraries (Microsoft Authentication Library -> MSAL)
- technical documentation
It allows all identities and access policies of users, devices, or applications to be managed from one place. Also, from the identity point of view, it allows using one set of credentials to access all the applications and resources needed (using the Single Sign On authentication scheme -> SSO). Moreover, with the help of API, CLI, and libraries, it can be seamlessly integrated into any application or infrastructure.
 Figure 1
Why should we use it, or what benefits does it bring?
Writing identity management solutions for an application is a complicated, time-consuming process during which a lot of functional and security bugs can be introduced. These bugs can result in dissatisfied users and even legal issues which, in the end, can cost companies business. So why reinvent the wheel? Instead, we can build upon a ready-to-use platform maintained daily by hundreds of specialists, which reduces the risks and saves the resources that can be invested into developing the feature that matters.
Azure Active Directory (Azure AD)
Azure Active Directory forms the core of the Microsoft Identity Platform. We can understand it as a representation of an organization or a department within it. Azure AD stores identities and access policies of users, devices, and applications and provides authentication and authorization services to them. These services can be provided for both:
- Internal identities -> identities that belong to a specific active directory (or organization/ tenant)
- External identities -> identities from other active directories (different organization/ tenant) or other identity providers (like Google or Facebook)
An administrator of organization A not only manages the identities within their directory but can also connect to organization B, synchronize identities from it, and set access permissions for them to access the resources from within company A. That enables different organizations to establish some level of trust, making cooperation between them easier and safer (this concept is called federation). That is achievable because Azure AD is:
- Globally available -> it is accessible anywhere on the internet and can authenticate different types of entities (users, devices, or applications) in a short amount of time,
- based on modern standardized authentication protocols like OAuth 2.0, OpenID Connect, or SAML.
Moreover, Azure AD provides numerous security features, such as:
- multi-factor authentication
- intrusion detection
- behavioral analytics and anomaly detection
- data loss protection
- alerting and reporting features
That helps to protect data within organizations from both insider and outsider threats.
Management portal (Azure Portal)
Through a web-based management portal, an administrator can create and manage Azure ADs (organizations/ tenants) and identities within them. For education/development purposes, you can create a free Microsoft 365 development tenant with sample data (fictive users, groups apps, and SharePoint documents) here. After your development tenant is set up, you can go to Microsoft Azure Portal and login. After login:
- search for “active directory”
- click the following item (see figure 2)
 Figure 2
Managing users from the portal
To create a new user, you can either click Add and then select User from the dropdown menu (1) or go to the Users section (2, see figure 3). We will take the second option and go through the Users section.
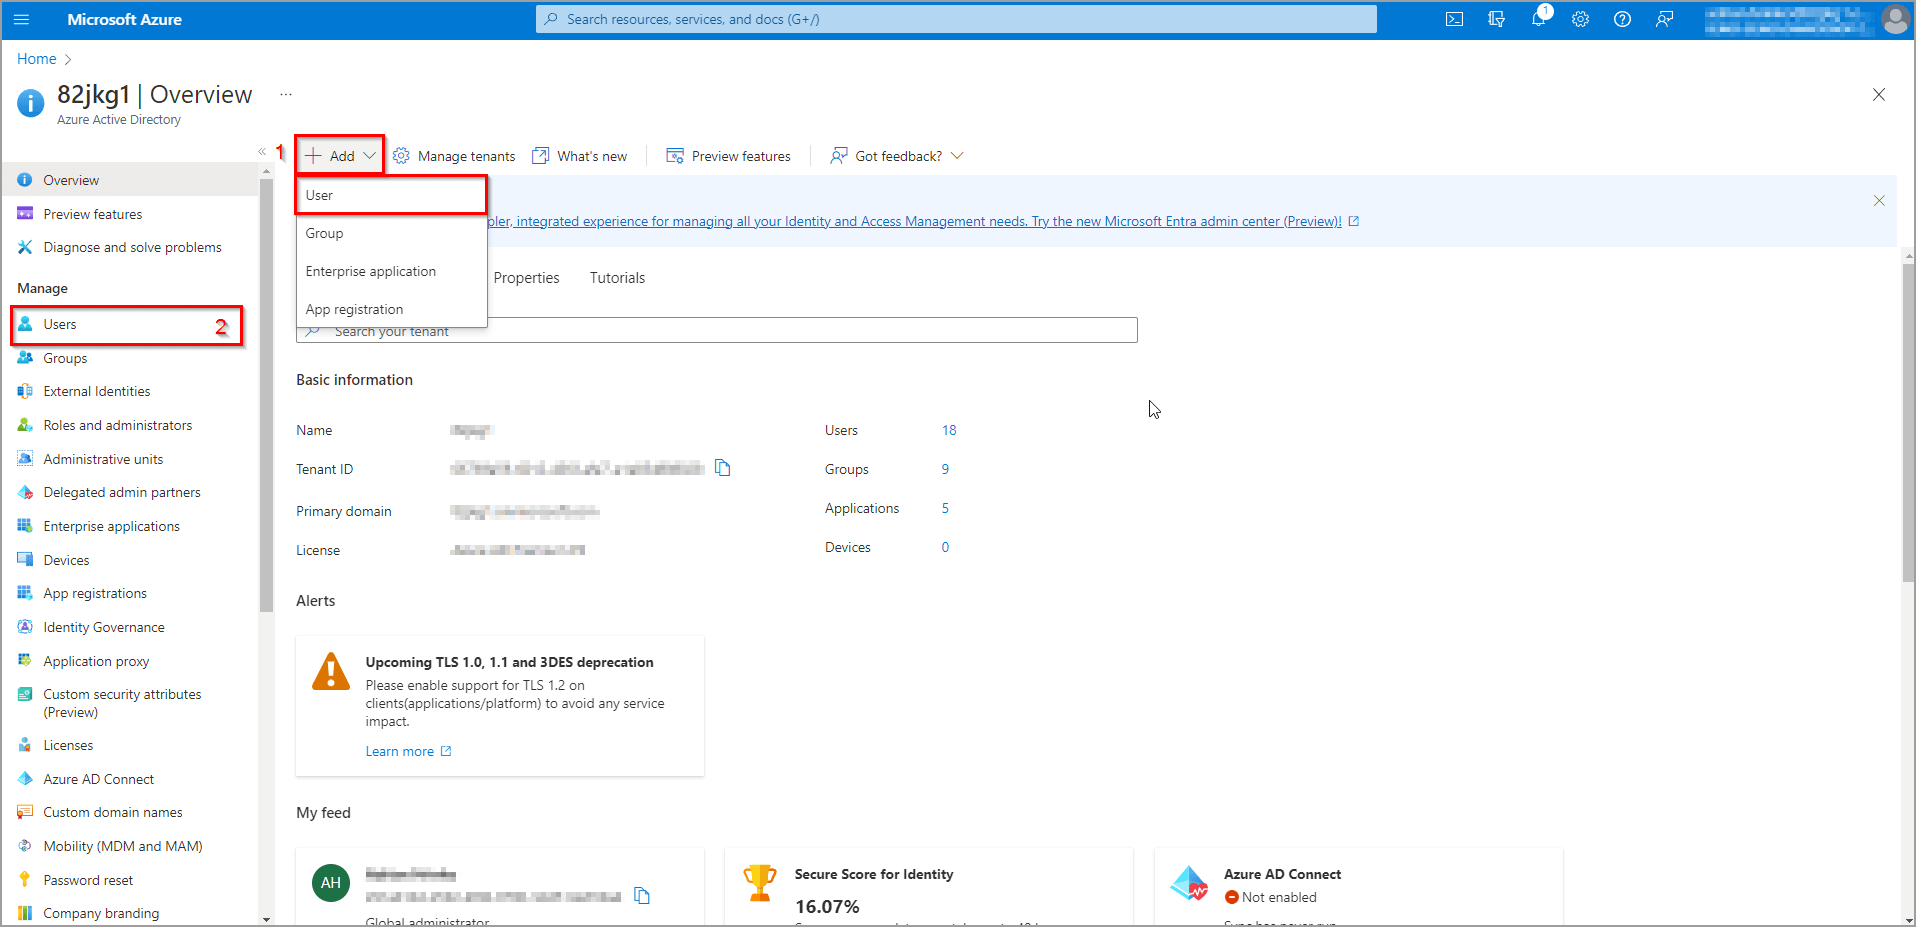 Figure 3
Here are listed all the users of the current tenant (see figure 4). Also, you can directly manage them from this view (create new, delete, assign group, edit info, and more).
Since we want to add a new user, we will click the New user button (1). As you can see, there are two options in the dropdown window (create or invite). The Create option creates a new user inside the current tenant. The Invite option invites a user from another active directory or identity provider (in that case, the identity provider that is responsible for the invited user must be added to the active directory so the user can log in with their credentials, but this is out of scope of this article). In this demonstration, we will just create a new user, so please click the Create new user option.
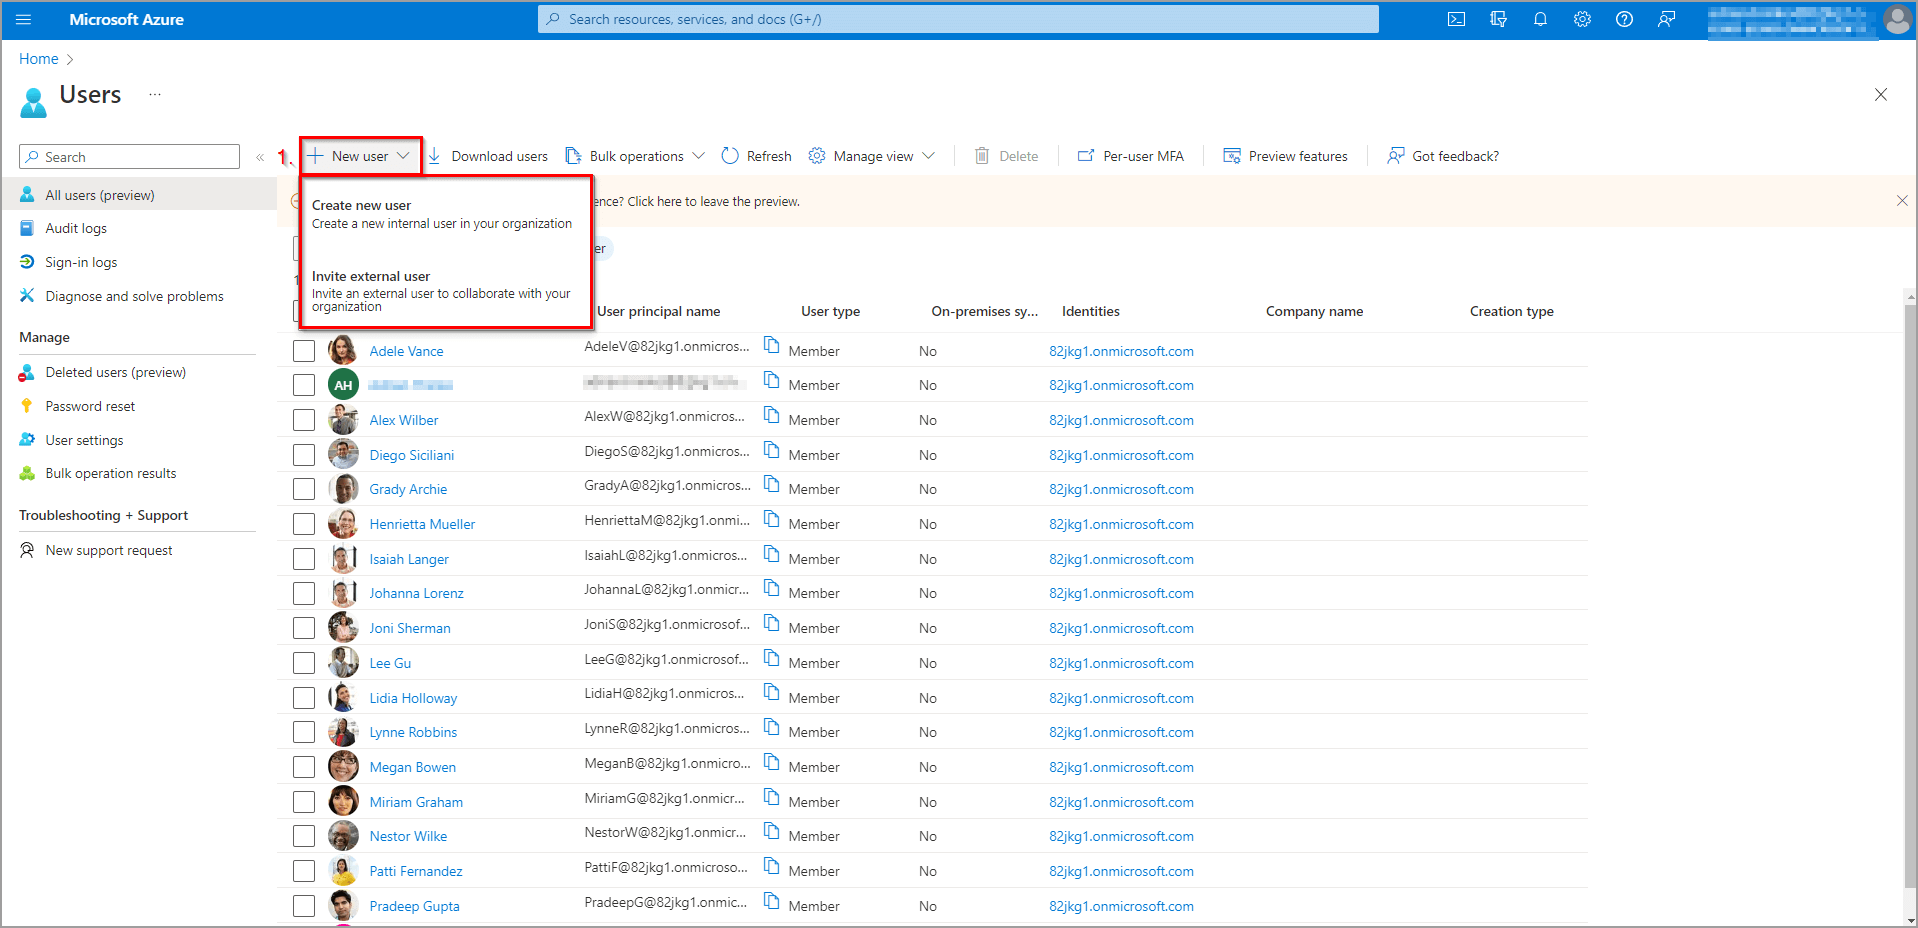 Figure 4
To create a new user, it is mandatory to specify a username and full name of the user (1, see figure 5). After that, we can either autogenerate or create the password for the user. In both cases, this is just a password for the first login, after which the user is prompted to change it. The next step is to assign the user to groups or roles (2). This can be configured in the slider window that appears on the left. This will define users’ access to your organization’s resources, so be careful how you set this. The last step is to specify job-related info (3, optional) and the user can be created by clicking the Create button (4).
 Figure 5
To manage a specific user, just click their name in the list in figure 4. After that, a view dedicated to the selected user is shown (see figure 6). Here you can:
- edit the info (1)
- reset their password or revoke their active sessions (2)
- assign roles (3)
- assign groups (4)
- assign roles for azure (5) and many more
 Figure 6
Managing applications from the portal
To create a new application, you can either click Add and select App registration from the dropdown window (1), or go to the App registrations section (2, see figure 7). We will take the second option and go through the App registrations section.
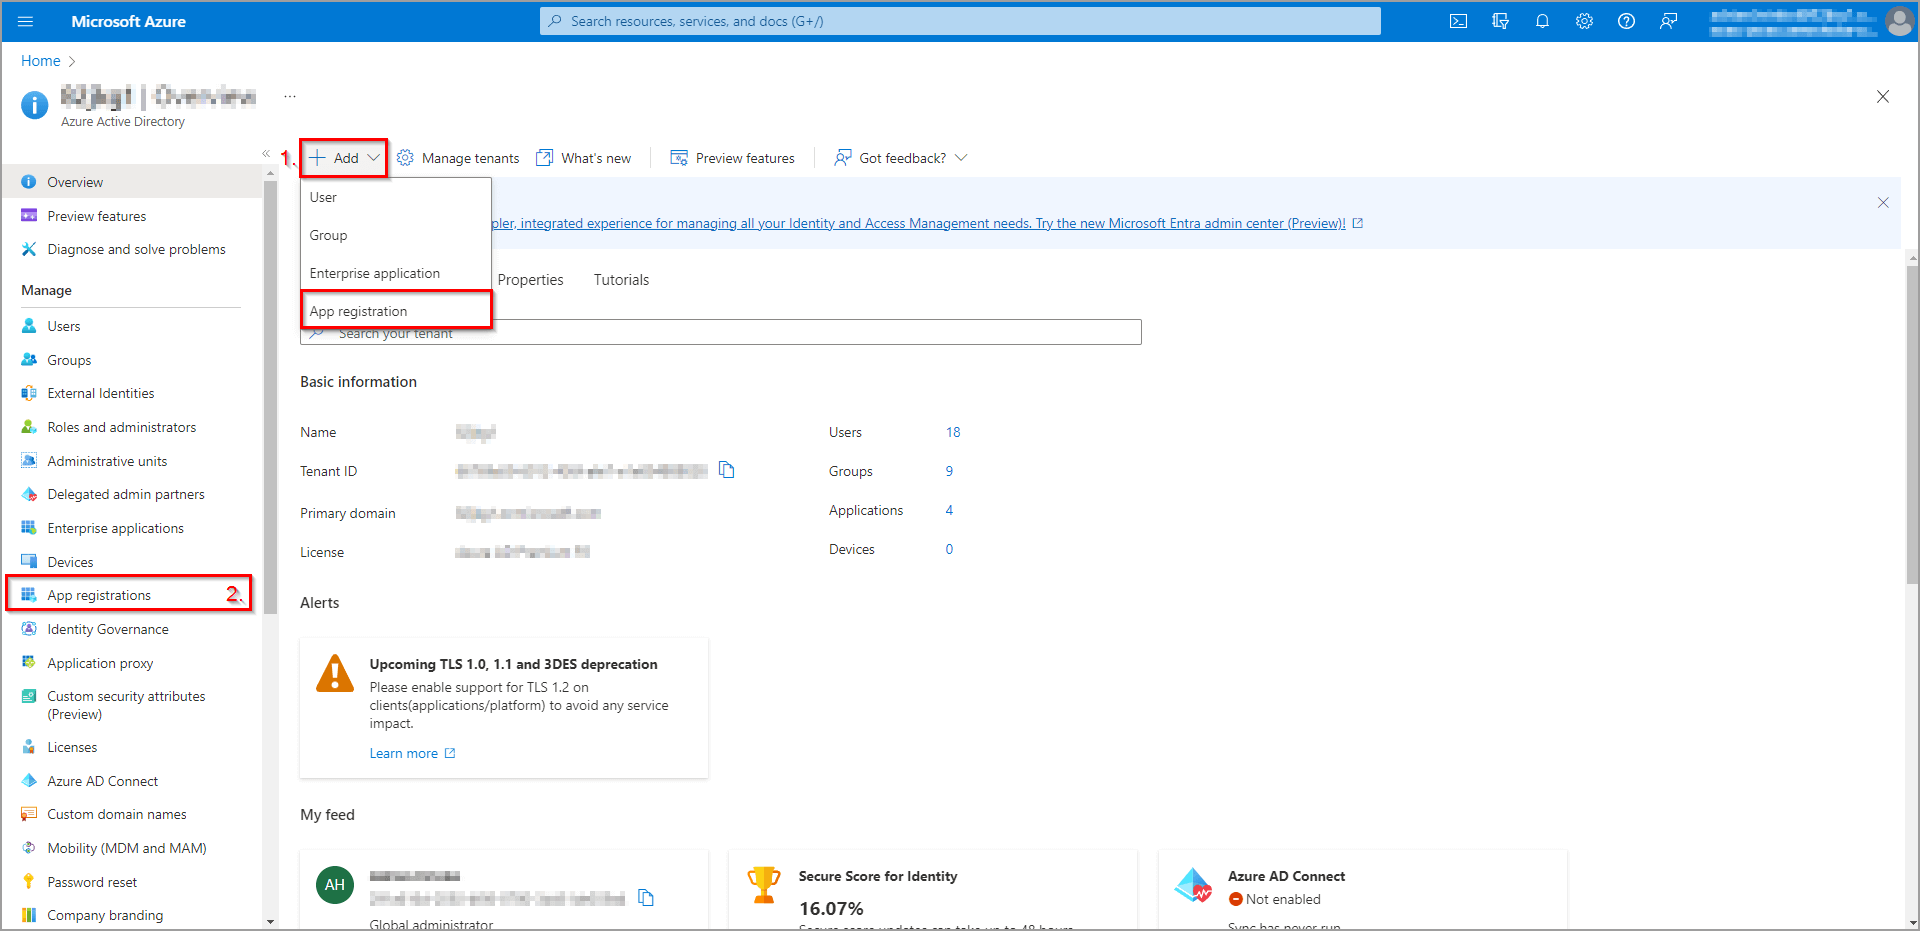 Figure 7
Similarly to users, there is a list of registered apps (see figure 8). These apps can be managed directly from the list. Let’s create a new application by clicking the New registration button.
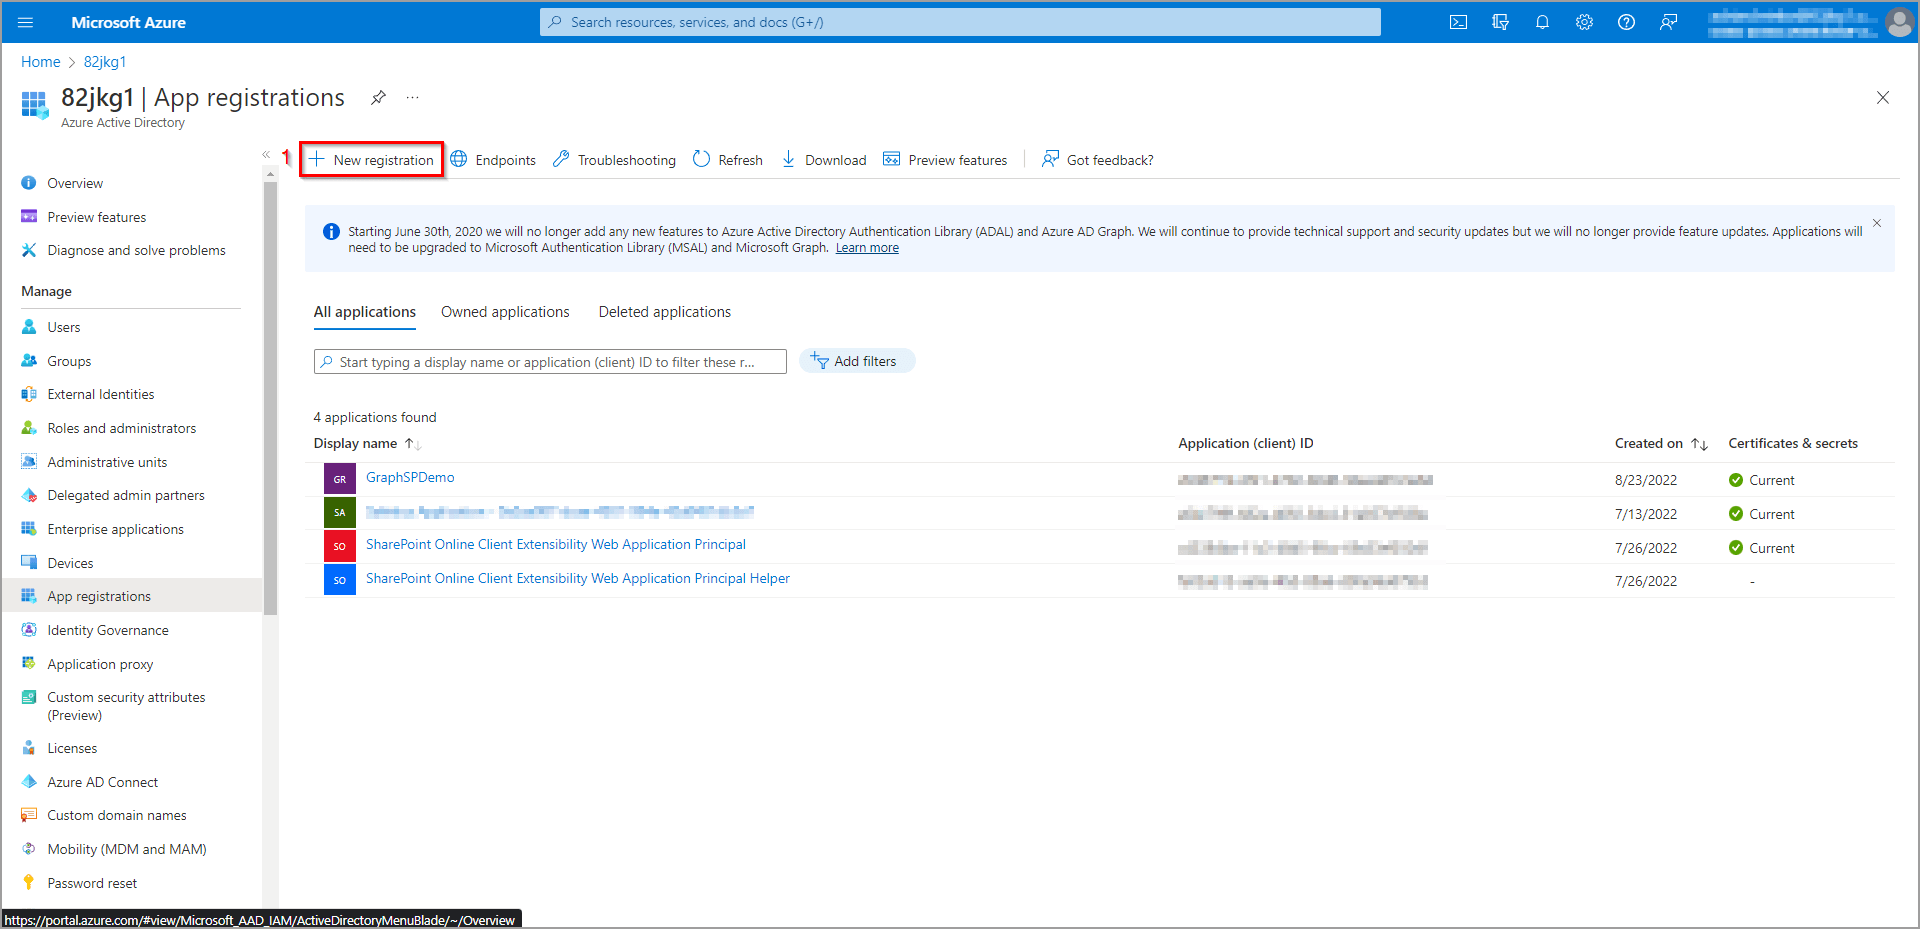 Figure 8
To register a new application (see figure 9), it is mandatory to select the name (1) and the type of the application (2). There are 4 different types from which we can choose, based on who gets access to the application:
- Accounts in this organizational directory only -> this application will be created only for your tenant, and only users from your tenant will be able to use it (i.e. you are creating an application for your organization only).
- Accounts in any organizational directory -> this application can be used by users from multiple tenants (i.e. you are creating an application for other organizations).
- Accounts in any organizational directory and personal Microsoft accounts -> this application can be used by other organizations and also by Microsoft personal accounts that do not belong to any organization (i.e. Outlook/ Skype/ Xbox accounts).
- Personal Microsoft accounts only -> this application can be accessed just by personal accounts.
The last step is to set up Redirect URI (3, optional). This is the URI, where the authentication response will be returned to. From here, we can obtain the authorization code to be exchanged for the access token (for more info, check OAuth2 or OpenID connection protocols). Finally, after we have everything set, we can click the Register button.
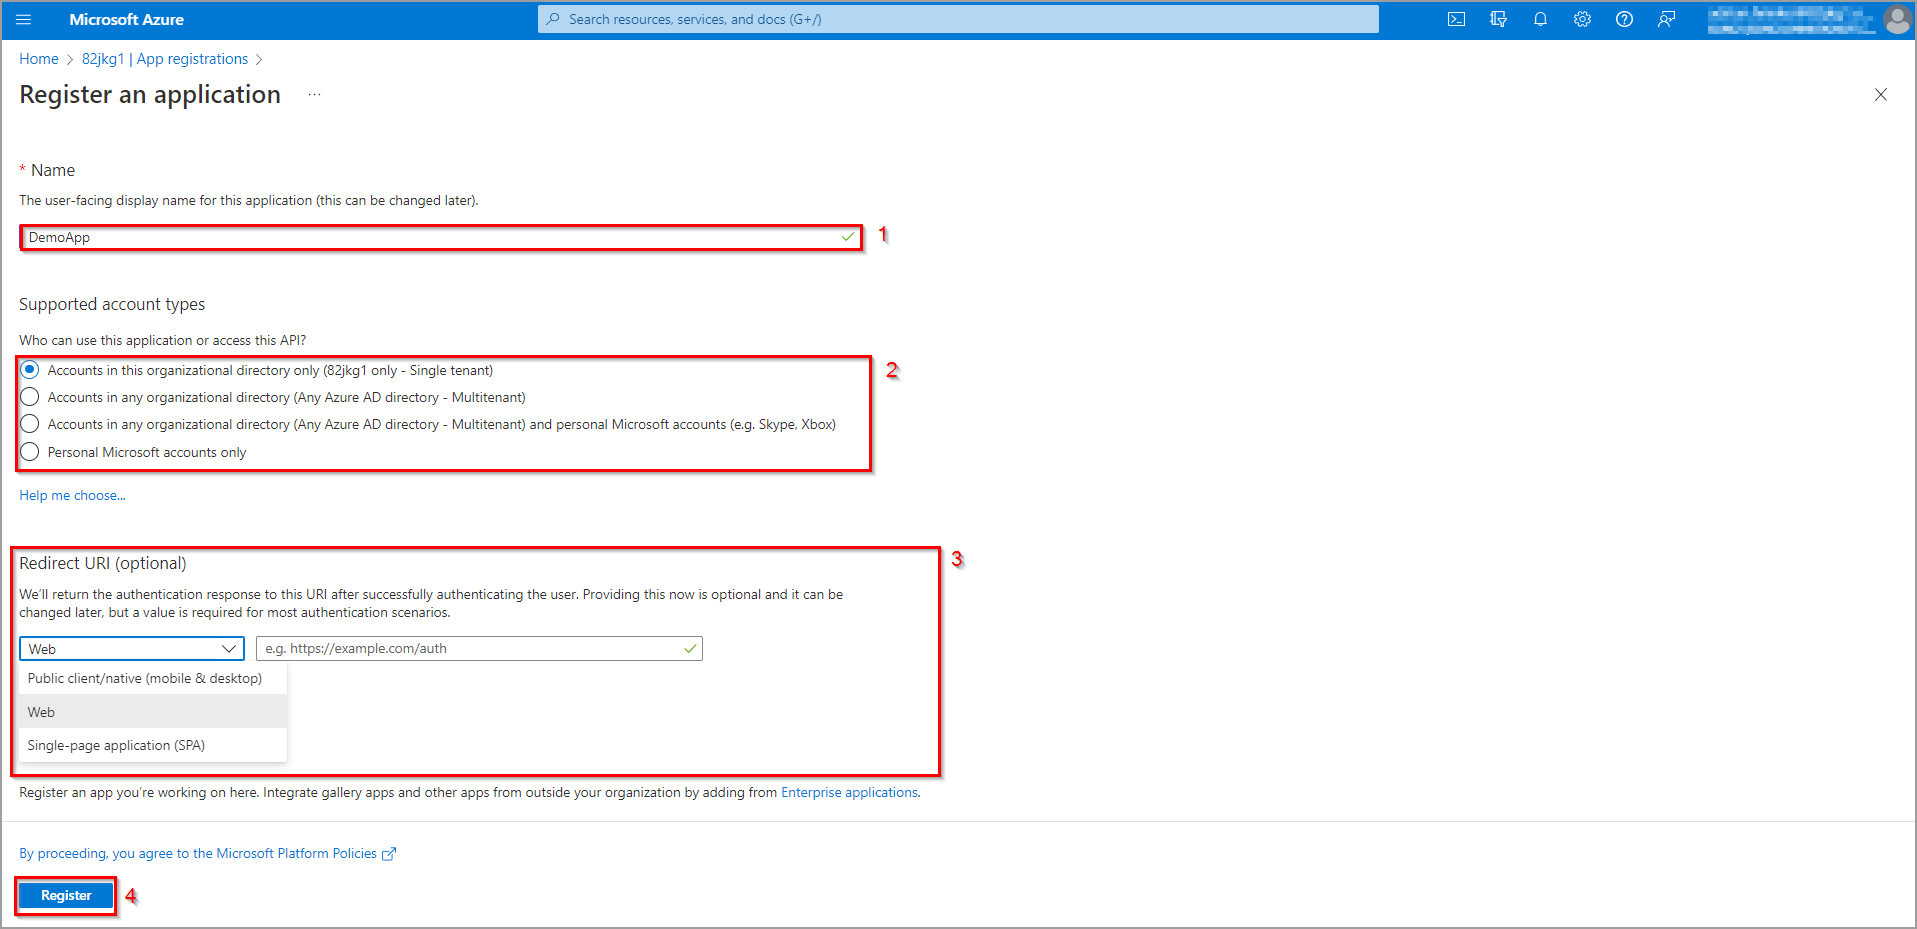 Figure 9
To manage specific applications, just click their name in the list (figure 8). After that, a view dedicated to the selected application is displayed (see figure 10). Here you can:
- configure the authentication method (1)
- define secrets or import certificates that enable applications to identify themselves (2)
- give the application permissions to access certain APIs (3)
- define and assign access roles for an application (4, RBAC) and many more
 Figure 10
API and CLI
API and CLI give the administrator even more capabilities since not all options that can be set in the management portal are available in the graphical interface. Moreover, using API and CLI, administrator actions can be easily automated via scripts or code that can be run from within some application or a CI pipeline. You can learn more about Azure AD API here and CLI here. The CLI can be installed on any platform. To install it on Windows just download the latest release here and run it. After you have CLI installed, open PowerShell and log in (we are using the –allow-no-subscriptions switch just in case you don’t have an Azure subscription yet):
> az login –allow-no-subscriptions
After you log in, you can type the following command to see what commands we can use and what is their functionality:
> az ad -h
Managing users via CLI
To see what options we have to manage users, just type the following command:
> az ad user -h
As you can see, we can list the users and all info about them using the list command, create, delete, or update the user, get all groups of which the user is a member using the get-member-groups command, or get information about a particular user using the show command. In this demonstration, we will show just how to create one. For that we will type the following command:
> az ad user create –display-name “Alastor Moody” –user-principal-name alastorm@[your-ad-domain-here].com –password “Str0ngPass!”
Now we have created a new user with a display name Alastor Moody, with ID alastorm@[your-ad-domain-here].comand we have also set him a password. To check if the user was successfully created, we can use the list command with the –query parameter (written in JMES syntax) to get only the full names of users:
> az ad user list --query [].displayName
Managing applications using CLI
Similarly to users, we can type the following command to see what commands we can use with apps:
> az ad app -h
As you can see, we can also list all applications, create, delete, update them, or show info about a particular one. Let’s create one using the create command:
> az ad app create –display-name “MyFirstApp”
Lastly, we can again check if the app has been created simply just by listing all apps with the following command:
> az ad app list –query [].displayName
Attention!
When you register an application this way, it does not create a service principal. The service principal object defines what the app can do for the specific tenant, who can access the app, and what resources the app can access. It is created in every tenant, where the application receives some permissions or roles to access some resources. Without the service principal, an application does not have any permission or role, and thus it cannot access any resource of the tenant. It can be, however, created separately and linked to the application using the following command:
> az ad sp create-for-rbac –name [app-display-name-here]
Microsoft Authentication Library (MSAL)
The Microsoft Authentication Library encapsulates the logic for different authentication flows that enable developers to obtain, cash, and refresh security token from the Microsoft Identity Platform. These tokens then provide secure access to Microsoft Graph, third-party web APIs, or your web API. It is available for different programming languages and platforms. More info about MSAL can be found here.
Technical documentation
Technical documentation is an important part of every service or product. Without documentation, the end user does not have information on how the service or product can be used. The full documentation of the Microsoft Identity Platform can be found here.

Author
Adrian Hrinko
Full-stack developer @Safetica
Next articles

Engineering
Blog articles

Engineering
Blog articles